


 [FD's BlOg] - Từ sau khi hoàn thiện thủ thuật "Recent posts" hiện thị giống trang tin247.com, mình nảy ý định hiển thị nhiều kiểu khác nhau cho các bài viết trong widget "Recent posts". Tức là bài này hiển có kèm ảnh thumbnail , bài khác thì chỉ hiển thị tiêu đề... Với cách này, tiện ích Recent posts của chúng ta sẽ không còn đơn điệu nữa.
Xem demo ở đây : LIVE DEMO

☼ Và đây là toàn bộ code của thủ thuật :
- Chỉ việc tạo 1 widget HTML/Javascript và dán tất cả code bên dưới vào:
<style type="text/css">
#cotent-news {
border:#999 solid 1px;
width: 650px;
}
#top-news {
width: 440px;
height:166px;
padding:5px;
border:#bbb solid 1px;
background:#eee;
font-size:12px;
}
#bottom-news {
width: 444px;
padding:5px;
}
#bottom-news-item {
width: 106px;
margin-right:5px;
float:left;
}
#left-news {
padding:5px;
border-left:2px dotted #ccc;
}
</style>
<script language="JavaScript">
imgr = new Array();
imgr[0] = "http://sites.google.com/site/fdblogsite/Home/nothumbnail.gif";
imgico= "http://farm3.static.flickr.com/2426/3638176588_31366a6822_o.gif";
showRandomImg = true;
topwidth = 160;
topheight = 160;
botheight = 100;
botwidth = 100;
fntsize = 12;
vnesize = 18; //kích thước của tiêu đề bài viết trong class "top-news"
acolor = "#555";
cmcolor = "#555";
topcolor = "#f00";
aBold = true;
text = "comments";
showPostDate = true;
summaryPost = 250;
summaryFontsize = 12;
summaryColor = "#000";
numposts = 17;
label = "Love";
home_page = "http://fandung.blogspot.com/";
</script>
<script src="http://data.fandung.com/blog/demo/vne-recent/vne-recent.js" type="text/javascript"></script>
Để hiểu rõ hơn cho việc chỉnh sửa độ rộng của khung, các bạn xem hình bên dưới:

- Tùy chỉnh lại số bài viết để việc hiển thị được hợp lý nhất.
- Tùy chỉnh lại các độ rộng theo ý bạn.
- Lưu ý với việc điều chỉnh độ rộng của class bottom-news , độ rộng của class này phải lớn hơn con số : 4x(botwidth + 2px + 4px) + 4x5px = 444px (vớibotwidth=100px), nếu độ rộng của class này nhỏ hơn con số trên, các bài viết sẽ bị tràn xuống hàng ở class bottom-news.
- Độ rộng của class bottom-news-item : botwidth + 2px + 4px = 106px;
- Link JS dự phòng :
<script src="http://sites.google.com/site/fdblogsite/js/vne-recent.txt" type="text/javascript"></script>
☼ Cập nhật bản khác của thủ thuật (bản hiển thị 3 bài viết ở class bottom-news):
Hình minh họa:

- Code của thủ thuật : ở đây mình sẽ đưa code đã chỉnh sửa sẵn, cho các bạn tiện sử dụng.
<style type="text/css">
#cotent-news {
border:#999 solid 1px;
width: 530px;
}
#top-news {
width: 330px;
height:126px;
padding:5px;
border:#bbb solid 1px;
background:#eee;
font-size:12px;
}
#bottom-news {
width: 333px;
padding:5px;
}
#bottom-news-item {
width: 106px;
margin-right:5px;
float:left;
}
#left-news {
padding:5px;
border-left:2px dotted #ccc;
}
</style>
<script language="JavaScript">
imgr = new Array();
imgr[0] = "http://sites.google.com/site/fdblogsite/Home/nothumbnail.gif";
imgico= "http://farm3.static.flickr.com/2426/3638176588_31366a6822_o.gif";
showRandomImg = true;
topwidth = 120;
topheight = 120;
botheight = 100;
botwidth = 100;
fntsize = 12;
vnesize = 16;
acolor = "#555";
cmcolor = "#555";
topcolor = "#f00";
aBold = true;
text = "comments";
showPostDate = true;
summaryPost = 100;
summaryFontsize = 12;
summaryColor = "#000";
numposts = 16;
label = "Love";
home_page = "http://fandung.blogspot.com/";
</script>
<script src="http://data.fandung.com/blog/demo/vne-recent/vne-recent(fix).js" type="text/javascript"></script>
- Nhưng code màu đỏ là nhưng chỗ mà mình đã chỉnh sửa lại.
- link file JS dự phòng:
<script src="http://sites.google.com/site/fdblogsite/js/vne-recent%28fix%29.txt" type="text/javascript"></script>
☼ Bản nâng cao của thủ thuật
- Với bản nâng cao này, các bạn có thể tùy chỉnh số bài viết ở class bottom-news.
- Code của thủ thuật sẽ thay đổi 1 chút như bên dưới:
...
...
...
summaryPost = 100;
summaryFontsize = 12;
summaryColor = "#000";
botnum = 3;
numposts = 16;
label = "Love";
home_page = "http://fandung.blogspot.com/";
</script>
<script src="http://data.fandung.com/blog/demo/vne-recent/vne-recent-adv.js" type="text/javascript"></script>
- với code botnum = 3; là code điều chỉnh số bài viết hiển thị ở class bottom-news
- Với bản nâng cao này, đòi hỏi bạn phải chỉnh sửa nhiều về phần kích thước trong code CSS để có được hiển thị như mong muốn.
- link file JS dự phòng:
<script src="http://sites.google.com/site/fdblogsite/js/vne-recent-adv.txt" type="text/javascript"></script>
Chúc các bạn thành công.
Đây là hình ảnh minh họa mình đã thực hiện:

☼ Và đây là toàn bộ code của thủ thuật :
- Chỉ việc tạo 1 widget HTML/Javascript và dán tất cả code bên dưới vào:
<style type="text/css">
#cotent-news {
border:#999 solid 1px;
width: 650px;
}
#top-news {
width: 440px;
height:166px;
padding:5px;
border:#bbb solid 1px;
background:#eee;
font-size:12px;
}
#bottom-news {
width: 444px;
padding:5px;
}
#bottom-news-item {
width: 106px;
margin-right:5px;
float:left;
}
#left-news {
padding:5px;
border-left:2px dotted #ccc;
}
</style>
<script language="JavaScript">
imgr = new Array();
imgr[0] = "http://sites.google.com/site/fdblogsite/Home/nothumbnail.gif";
imgico= "http://farm3.static.flickr.com/2426/3638176588_31366a6822_o.gif";
showRandomImg = true;
topwidth = 160;
topheight = 160;
botheight = 100;
botwidth = 100;
fntsize = 12;
vnesize = 18; //kích thước của tiêu đề bài viết trong class "top-news"
acolor = "#555";
cmcolor = "#555";
topcolor = "#f00";
aBold = true;
text = "comments";
showPostDate = true;
summaryPost = 250;
summaryFontsize = 12;
summaryColor = "#000";
numposts = 17;
label = "Love";
home_page = "http://fandung.blogspot.com/";
</script>
<script src="http://data.fandung.com/blog/demo/vne-recent/vne-recent.js" type="text/javascript"></script>
Để hiểu rõ hơn cho việc chỉnh sửa độ rộng của khung, các bạn xem hình bên dưới:

- Tùy chỉnh lại số bài viết để việc hiển thị được hợp lý nhất.
- Tùy chỉnh lại các độ rộng theo ý bạn.
- Lưu ý với việc điều chỉnh độ rộng của class bottom-news , độ rộng của class này phải lớn hơn con số : 4x(botwidth + 2px + 4px) + 4x5px = 444px (vớibotwidth=100px), nếu độ rộng của class này nhỏ hơn con số trên, các bài viết sẽ bị tràn xuống hàng ở class bottom-news.
- Độ rộng của class bottom-news-item : botwidth + 2px + 4px = 106px;
- Link JS dự phòng :
<script src="http://sites.google.com/site/fdblogsite/js/vne-recent.txt" type="text/javascript"></script>
☼ Cập nhật bản khác của thủ thuật (bản hiển thị 3 bài viết ở class bottom-news):

- Code của thủ thuật : ở đây mình sẽ đưa code đã chỉnh sửa sẵn, cho các bạn tiện sử dụng.
<style type="text/css">
#cotent-news {
border:#999 solid 1px;
width: 530px;
}
#top-news {
width: 330px;
height:126px;
padding:5px;
border:#bbb solid 1px;
background:#eee;
font-size:12px;
}
#bottom-news {
width: 333px;
padding:5px;
}
#bottom-news-item {
width: 106px;
margin-right:5px;
float:left;
}
#left-news {
padding:5px;
border-left:2px dotted #ccc;
}
</style>
<script language="JavaScript">
imgr = new Array();
imgr[0] = "http://sites.google.com/site/fdblogsite/Home/nothumbnail.gif";
imgico= "http://farm3.static.flickr.com/2426/3638176588_31366a6822_o.gif";
showRandomImg = true;
topwidth = 120;
topheight = 120;
botheight = 100;
botwidth = 100;
fntsize = 12;
vnesize = 16;
acolor = "#555";
cmcolor = "#555";
topcolor = "#f00";
aBold = true;
text = "comments";
showPostDate = true;
summaryPost = 100;
summaryFontsize = 12;
summaryColor = "#000";
numposts = 16;
label = "Love";
home_page = "http://fandung.blogspot.com/";
</script>
<script src="http://data.fandung.com/blog/demo/vne-recent/vne-recent(fix).js" type="text/javascript"></script>
- Nhưng code màu đỏ là nhưng chỗ mà mình đã chỉnh sửa lại.
- link file JS dự phòng:
<script src="http://sites.google.com/site/fdblogsite/js/vne-recent%28fix%29.txt" type="text/javascript"></script>
☼ Bản nâng cao của thủ thuật
- Với bản nâng cao này, các bạn có thể tùy chỉnh số bài viết ở class bottom-news.
- Code của thủ thuật sẽ thay đổi 1 chút như bên dưới:
...
...
...
summaryPost = 100;
summaryFontsize = 12;
summaryColor = "#000";
botnum = 3;
numposts = 16;
label = "Love";
home_page = "http://fandung.blogspot.com/";
</script>
<script src="http://data.fandung.com/blog/demo/vne-recent/vne-recent-adv.js" type="text/javascript"></script>
- với code botnum = 3; là code điều chỉnh số bài viết hiển thị ở class bottom-news
- Với bản nâng cao này, đòi hỏi bạn phải chỉnh sửa nhiều về phần kích thước trong code CSS để có được hiển thị như mong muốn.
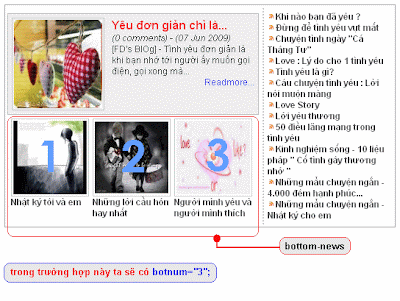
- Xem hình minh họa bên dưới:

- link file JS dự phòng:
<script src="http://sites.google.com/site/fdblogsite/js/vne-recent-adv.txt" type="text/javascript"></script>
Chúc các bạn thành công.

 Nhãn:
Blogger Tips
Nhãn:
Blogger Tips
 Bài đăng trước đó

Nhận xét
0 nhận xét cho bài: "Style mới cho tiện ích "Recent post" theo label ở Homepage"
Đăng nhận xét